
Our Faux Brick Wall Using German Schmear
Once upon a time, doing a faux brick feature wall was never even a twinkle in my eye. We had a spare bedroom for guests in our finished basement. Not all that long after we gained that bedroom with our basement renovations, I started a business. And this business required a lot of STUFF! Fast forward to 2019 and SPACE IS AT A PREMIUM in said basement. (Update to 2020: space is even more a premium!)
I started this year desperately searching for ways to find space. Space to create, host workshops, have an office, allow two employees to have room to work, store our subscription box supplies, store our custom order and workshop supplies. Oh, and we still needed space for our family to spend time down there also!
At the start of 2019, I decided that, until a separate space (garage, rented space, etc.) comes along, I needed to make do with what I have and maximize the heck out of it. So, since there is a large window in the spare room…DING DING DING…the lightbulb went on… We could eliminate our spare room and convert it into a staging room complete with all of my styling accessories. A stationary wall in front of which I can get photographs was the main goal with the faux brick paneling idea.
If you’ve been following me on social media for a while now, you know that my husband (let’s call him Mr. Home Matters, or MHM for short – hey, that’s the same initials as MY Home Matters!) is pretty awesome. He went down a pretty serious path about a year ago by building me a sliding staging wall over in the unfinished, window-less side of the basement (aka my dungeon-esque workshop).
MHM was totally onboard with me doing a feature wall in the soon-to-be-former spare room (this is huge for him…because I have been known to change my mind a time or two). Of course, I assured him it would be one that could remain even if/when the room goes back to being an actual room for guests. I mean I love the idea of having a feature wall as a backdrop behind a headboard! It’s probably the most character (when it comes to the actual bones of our home) that we’d have anywhere in the house!
(July 2020 update...I have tried to add a lot more (inexpensive) character to the house this year with faux wood beams and a faux wood front door. In addition, I updated our mantel in our bedroom and added peel and stick shiplap in several rooms.)

Keeping in mind the purpose of this wall was to be good for styling furniture, signs and other home décor in front of it, those options were A) shiplap and B) doctored up faux brick. And then I asked my followers on Facebook and Instagram to help me decide. The overwhelming majority chose shiplap…not a surprise. However, the more I thought, the more I felt in my gut that brick was the way to go. So, decision made. I’ve done enough projects to learn that you ALWAYS should follow your gut.
The time had come...meaning time to hop on the BLOGwagon. Time to quit making excuses and start. Surely there is someone out there interested in what I have to offer in terms of home décor and DIY so if this can help one person, then it’s a win!


Will you work from left to right? Maybe you want to center one in the middle of the wall and then work on either side? We opted to start at the left side of the wall and move to the right, so we had two full sheets and had to cut down the last sheet. Not only did MHM measure floor to ceiling (and we did have a slight slant to our ceiling) and cut off the excess from the height, but then he measured and marked exactly where the outlet needed to be cut out.


We used brad nails but you could first use liquid nail if you want this to be more permanent. Be sure to get the nails into the studs and going down each stud every few bricks. Move on to the next panel and the next until all are up and pushed right up next to each other.
You will need to work on lining up the grout lines – we found that we had to shave off about ¼ inch of each of the second two panels AFTER they were cut to height in order to make the grout lines match up. But luckily that ¼ inch didn’t make enough of a difference in the overall height of the board. One thing we kept in mind was that we were planning to add a piece of trim at the top to cover/hide any gaps. So we knew we had a little wiggle room!


Once all three boards were up and secured to the wall, MHM was relieved of his duties. The next morning I was chomping at the bit to get started with the German Schmear technique!
I started by putting painter’s tape on the two side walls at the corners of the room so that I didn’t have to worry about getting mud on those walls. Next, I applied a generous amount of drywall compound to a section of the wall (using a putty knife). Working my way from the left to the right of the wall, I started to get giddy.
I applied enough of the drywall mud to make sure to fill in the mortar joints completely and then I played with the amount that stayed on the actual surface of the bricks. To make sure it had a random feel, I worked the knife in all directions.


After I did about a 2x2 foot section, I stepped back to see how I liked it and added more or scraped away more in areas. I began to get the feel of it and kept working my way down the left-most panel across to the right. This was FUN!

 My research seemed to show me that many people first caulked the joints between the wallboards. OR they started there with the drywall mud, making sure to cover the joint the entire way down. However, I still felt like I could see the joints in several of the tutorial pics that I came across and this was my biggest fear with this project. I definitely did not want to see the joints!
My husband convinced me to not use the caulking and just apply the mud as usual. So when I got to that joint between the first and second boards, I continued as normal and just added a very slight extra layer over the bricks themselves. Not all bricks but some. And the mortar joints had to be filled completely anyway, so that covered the joint in those spots (at least it worked for me like that)! I am pleased with the outcome at the joint lines!
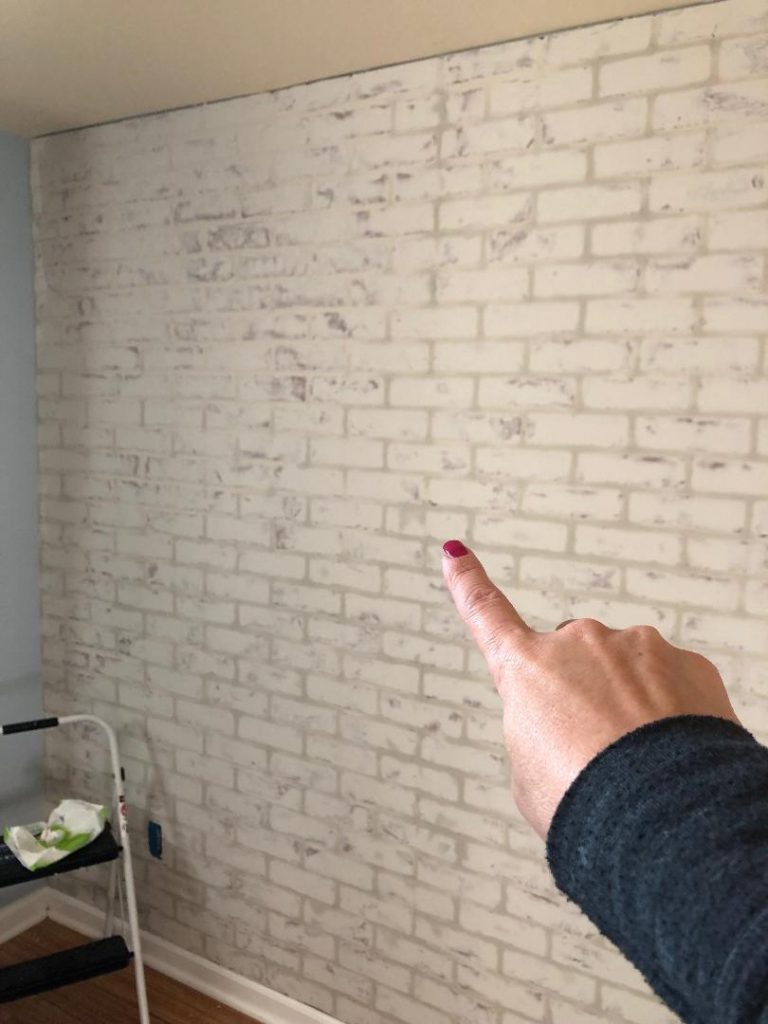
Time will tell whether there will be any type of settling. But at this point, I was in the zone… I wasn’t quitting until I had this wall totally German Schmearified! The photos below show me pointing to the two places where the wall board seams were.

Once I got the entire wall done, I went back to the gaps on either side of the wall (left and right sides of the wall). Those gaps needed to be filled with drywall mud. (This is why the painters’ tape is super important if you don’t want to mess up your other walls!) I had exactly the right amount of mud for this sized wall, as you can see in this photo.

After letting the entire wall dry for almost 24 hours, I “sealed” in the drywall mud by applying a white-wash over top. If you do not seal it, there will be a dusty film that can brush off on anything that touches it. I had about ¼ quart of Bistro White leftover from another project and I added another ¼ to ½ can of water and mixed to water the white down. Then I generously applied it with a paint brush (painting horizontally) across the entire wall, one section at a time. This also allowed me to tone down the red that was still coming through… which I LOVED, might I add. BUT, I was worried the red peeks of brick showing through might interfere with some of my furniture that would be styled in front of it.
Perhaps I will do this again in another area of my home and, when the time comes, I’ll go for more of an exposed brick look. This project needed to be more subtle.
The last step was to add the crown molding at the top of the wall to cover the uneven gap that was showing. I chose an inexpensive and unfinished style (nothing too large). Before applying some glue and nailing it into the studs with my brad nailer, I applied primer.
I had to cut a second piece to fit since the pieces were not long enough for the entire wall. Once both pieces were up, drywall spackling filled the gap between the pieces and to hide the nail head. (I did sand this down smoothly once dry before moving on.)


Once that was dry, I raided the paint shelf and found JUST BARELY enough of the same paint I had used on all of our other basement trim… YEEEESSSSSSS!!
There was once a point in time where I was organized to a fault… and today it paid off! Look at those fancy labels I even created! For a brief moment, the skies parted and the sun poured down while the angels sang. I basked in the glory of my inner Monica Geller from Friends. Well, that was before I was quickly brought back to reality after tripping over the pile of staging items I had to shove out of the way to do this project in the first place.
Finally, I painted the top piece of trim with my unbelievably and shockingly perfect leftover amount of trim paint in that mason jar followed by an application of white paintable caulking.
MHM came home right about the time that I was applying the caulking. Even he pointed out that our meticulous carpenter friend who finished our basement and also completed our original home renovations would be proud of my caulking skills. After all, he is the one who taught me that not-so-fun skill (but I secretly sort of love caulking)!
 So, even though we no longer have that spare room, I do now have a space where I can style and stage and store – and I can close the door when it’s a mess (which is most of the time). Here are some photos I tried out in front of the new wall.
So, there you have it…my no-more-excuses-very-first-blog-post and, with any luck, we’ll both stick around long enough to write or read more of them! I hope this will help you gain confidence to go for it if you’re thinking of creating a feature wall like this in your home!

I started this year desperately searching for ways to find space. Space to create, host workshops, have an office, allow two employees to have room to work, store our subscription box supplies, store our custom order and workshop supplies. Oh, and we still needed space for our family to spend time down there also!
What started this idea?
At the start of 2019, I decided that, until a separate space (garage, rented space, etc.) comes along, I needed to make do with what I have and maximize the heck out of it. So, since there is a large window in the spare room…DING DING DING…the lightbulb went on… We could eliminate our spare room and convert it into a staging room complete with all of my styling accessories. A stationary wall in front of which I can get photographs was the main goal with the faux brick paneling idea.
My husband is the best.
If you’ve been following me on social media for a while now, you know that my husband (let’s call him Mr. Home Matters, or MHM for short – hey, that’s the same initials as MY Home Matters!) is pretty awesome. He went down a pretty serious path about a year ago by building me a sliding staging wall over in the unfinished, window-less side of the basement (aka my dungeon-esque workshop).
MHM was totally onboard with me doing a feature wall in the soon-to-be-former spare room (this is huge for him…because I have been known to change my mind a time or two). Of course, I assured him it would be one that could remain even if/when the room goes back to being an actual room for guests. I mean I love the idea of having a feature wall as a backdrop behind a headboard! It’s probably the most character (when it comes to the actual bones of our home) that we’d have anywhere in the house!
(July 2020 update...I have tried to add a lot more (inexpensive) character to the house this year with faux wood beams and a faux wood front door. In addition, I updated our mantel in our bedroom and added peel and stick shiplap in several rooms.)
I narrowed the endless options down to two...
Keeping in mind the purpose of this wall was to be good for styling furniture, signs and other home décor in front of it, those options were A) shiplap and B) doctored up faux brick. And then I asked my followers on Facebook and Instagram to help me decide. The overwhelming majority chose shiplap…not a surprise. However, the more I thought, the more I felt in my gut that brick was the way to go. So, decision made. I’ve done enough projects to learn that you ALWAYS should follow your gut.
The time had come...meaning time to hop on the BLOGwagon. Time to quit making excuses and start. Surely there is someone out there interested in what I have to offer in terms of home décor and DIY so if this can help one person, then it’s a win!
Materials needed (my wall was 10’7” wide and just under 7 ft tall):
- 4x8 Faux Brick Panels (I purchased mine from The Home Depot) $33.78/each and I needed three of them
- Joint Compound (I used Sheetrock All Purpose 3.5 Qt Pre-Mixed Joint Compound) and I scraped EVERY SINGLE BIT I could out of that pail for this sized wall!
- Putty knife or knives (I used one 6” wide)
- Nail gun (we used 1.25” nails)
- Liquid nail (IF and only IF you intend to have this wall be up for a long time…as I said earlier, I tend to change my mind more frequently than the average person so it was my suggestion to just nail it and not use glue…but my husband and I both liked it so much that he actually said we should have used glue!)
- Baby wipes or damp paper towels/cloths
- Painter’s tape
- Circular saw, wallboard saw, utility knife
- Crown molding or trim for the top
- White Paint (I used Valspar’s Signature brand in a color called Bistro White because that is what I had on hand) for a white wash over the brick, if you choose to do so
- Trim paint (I had some leftover from our basement remodel – just a regular trim paint in semi-gloss)
First, decide where you’ll be starting to put the wallboards...
Will you work from left to right? Maybe you want to center one in the middle of the wall and then work on either side? We opted to start at the left side of the wall and move to the right, so we had two full sheets and had to cut down the last sheet. Not only did MHM measure floor to ceiling (and we did have a slight slant to our ceiling) and cut off the excess from the height, but then he measured and marked exactly where the outlet needed to be cut out.
Next, attach the first wallboard to the wall.
We used brad nails but you could first use liquid nail if you want this to be more permanent. Be sure to get the nails into the studs and going down each stud every few bricks. Move on to the next panel and the next until all are up and pushed right up next to each other.
You will need to work on lining up the grout lines – we found that we had to shave off about ¼ inch of each of the second two panels AFTER they were cut to height in order to make the grout lines match up. But luckily that ¼ inch didn’t make enough of a difference in the overall height of the board. One thing we kept in mind was that we were planning to add a piece of trim at the top to cover/hide any gaps. So we knew we had a little wiggle room!
Once all three boards were up and secured to the wall, MHM was relieved of his duties. The next morning I was chomping at the bit to get started with the German Schmear technique!
I thought this next step was the most fun...
I started by putting painter’s tape on the two side walls at the corners of the room so that I didn’t have to worry about getting mud on those walls. Next, I applied a generous amount of drywall compound to a section of the wall (using a putty knife). Working my way from the left to the right of the wall, I started to get giddy.
I applied enough of the drywall mud to make sure to fill in the mortar joints completely and then I played with the amount that stayed on the actual surface of the bricks. To make sure it had a random feel, I worked the knife in all directions.
After I did about a 2x2 foot section, I stepped back to see how I liked it and added more or scraped away more in areas. I began to get the feel of it and kept working my way down the left-most panel across to the right. This was FUN!
What about those seams?
My research seemed to show me that many people first caulked the joints between the wallboards. OR they started there with the drywall mud, making sure to cover the joint the entire way down. However, I still felt like I could see the joints in several of the tutorial pics that I came across and this was my biggest fear with this project. I definitely did not want to see the joints!My husband convinced me to not use the caulking and just apply the mud as usual. So when I got to that joint between the first and second boards, I continued as normal and just added a very slight extra layer over the bricks themselves. Not all bricks but some. And the mortar joints had to be filled completely anyway, so that covered the joint in those spots (at least it worked for me like that)! I am pleased with the outcome at the joint lines!
Time will tell whether there will be any type of settling. But at this point, I was in the zone… I wasn’t quitting until I had this wall totally German Schmearified! The photos below show me pointing to the two places where the wall board seams were.
Finishing touches...
Once I got the entire wall done, I went back to the gaps on either side of the wall (left and right sides of the wall). Those gaps needed to be filled with drywall mud. (This is why the painters’ tape is super important if you don’t want to mess up your other walls!) I had exactly the right amount of mud for this sized wall, as you can see in this photo.
After letting the entire wall dry for almost 24 hours, I “sealed” in the drywall mud by applying a white-wash over top. If you do not seal it, there will be a dusty film that can brush off on anything that touches it. I had about ¼ quart of Bistro White leftover from another project and I added another ¼ to ½ can of water and mixed to water the white down. Then I generously applied it with a paint brush (painting horizontally) across the entire wall, one section at a time. This also allowed me to tone down the red that was still coming through… which I LOVED, might I add. BUT, I was worried the red peeks of brick showing through might interfere with some of my furniture that would be styled in front of it.
Perhaps I will do this again in another area of my home and, when the time comes, I’ll go for more of an exposed brick look. This project needed to be more subtle.
I was out of my comfort zone on this next step but I did it nonetheless!
The last step was to add the crown molding at the top of the wall to cover the uneven gap that was showing. I chose an inexpensive and unfinished style (nothing too large). Before applying some glue and nailing it into the studs with my brad nailer, I applied primer.
I had to cut a second piece to fit since the pieces were not long enough for the entire wall. Once both pieces were up, drywall spackling filled the gap between the pieces and to hide the nail head. (I did sand this down smoothly once dry before moving on.)
Once that was dry, I raided the paint shelf and found JUST BARELY enough of the same paint I had used on all of our other basement trim… YEEEESSSSSSS!!
There was once a point in time where I was organized to a fault… and today it paid off! Look at those fancy labels I even created! For a brief moment, the skies parted and the sun poured down while the angels sang. I basked in the glory of my inner Monica Geller from Friends. Well, that was before I was quickly brought back to reality after tripping over the pile of staging items I had to shove out of the way to do this project in the first place.
Finally, I painted the top piece of trim with my unbelievably and shockingly perfect leftover amount of trim paint in that mason jar followed by an application of white paintable caulking.
I think the hubs was proud!
MHM came home right about the time that I was applying the caulking. Even he pointed out that our meticulous carpenter friend who finished our basement and also completed our original home renovations would be proud of my caulking skills. After all, he is the one who taught me that not-so-fun skill (but I secretly sort of love caulking)!
So, even though we no longer have that spare room, I do now have a space where I can style and stage and store – and I can close the door when it’s a mess (which is most of the time). Here are some photos I tried out in front of the new wall. 


So, there you have it…my no-more-excuses-very-first-blog-post and, with any luck, we’ll both stick around long enough to write or read more of them! I hope this will help you gain confidence to go for it if you’re thinking of creating a feature wall like this in your home!
16 comments
I loved this after I saw the Gaines do it on the exterior of a house they were doing. It would be great to update a red brick fireplace. Thanks for sharing. Your wall looks great.
very nice :)
Another job well done!
Amazing job as always! You are an inspiration!
Looks great! But then everything you do looks great! Congratulations