My Experience with Appliance Paint
Share
You heard me correctly! I said appliance paint! If you've been following me on social media, you know that I've been working super hard on renovating our camper. We have a seasonal spot in a campground along Lake Erie. After twelve years of owning this particular park model trailer, I finally had the itch to make it feel more like a lake home and less like a camper. And Mr. Home Matters agreed to let me do my thing. If you want to catch my sneak peek reveals to date, you can do so here.
(This post may contain affiliate links which means that if you purchase a product from my link, I may receive a small commission. The good news is that this comes at no additional cost to you! Read my full privacy disclosure here: Privacy Notice)
Earlier this summer, I noticed stuff on our white full-sized refrigerator that was driving me nuts! I had never noticed it before and I thought it was some type of dirt from dirty little hands over time. I scrubbed and scrubbed and nothing was working to get it off. My husband said it was actually rust. Then the light bulb went off. My dad used stainless steel appliance paint several years ago to paint their appliances and I thought it was the coolest product! I had been wanting to try stainless steel appliance paint but have been hesitant in our own home. Our black appliances and smooth cook top seemed a bit daunting.
Ding ding ding! Maybe this was my chance! Plus, being that it was the camper fridge, I wasn't too worried if it wasn't perfect. So, I purchased this paint from Amazon and took a bunch of foam brushes up to the lake and went to town one evening.
While I did remove the handles right away and put them aside to bring home to spray black, I quickly realized I was using too small of a foam brush to apply the paint. But it was all I had quickly available, so I went with it anyway. Because the store means I would lose a good hour of time and I didn't want to waste any when I'm working up there - it just takes away from family time! I followed the instructions in terms of stirring and applied long even strokes as best I could with the little one-inch foam brush. I knew immediately this brush was too small and wished I had brought a foam roller like the instructions recommended.
My next mistake was starting too late in the day. This stuff stinks pretty badly and it did not allow enough time for the windows and fans to suck the smell out before we wanted to go to bed. It wasn't the most pleasant sleeping but it could have been worse and we survived.
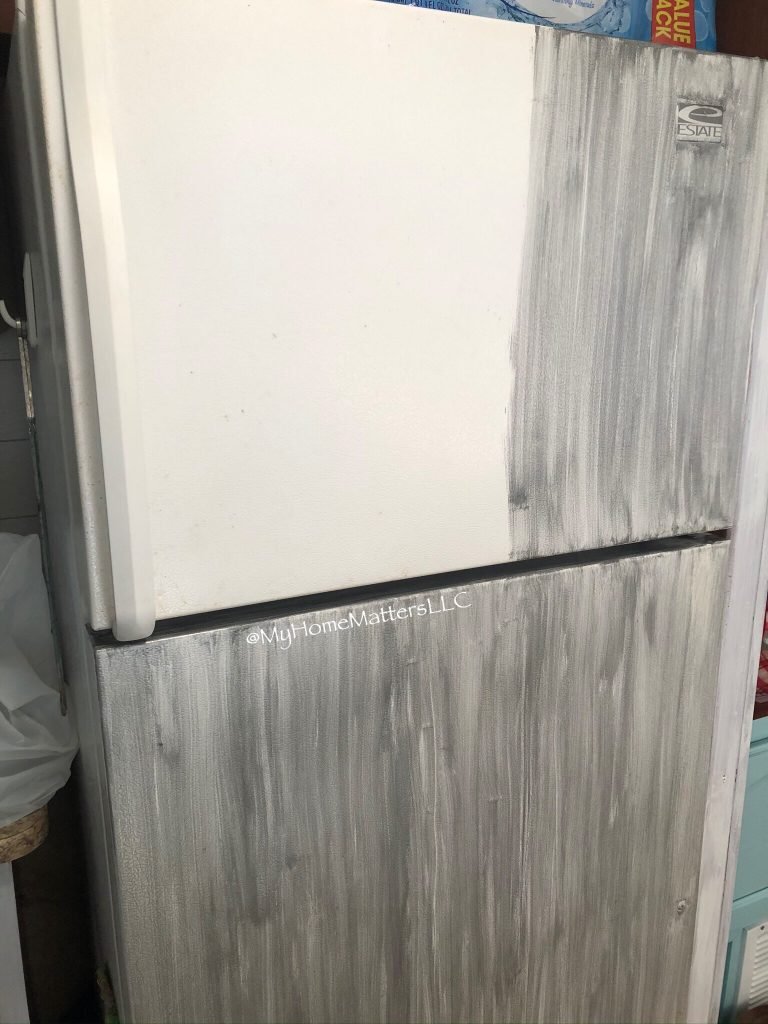
Coat number one looked pretty much like a train wreck. But I didn't panic because that is often the case with a primer coat or first coat. With more coats, that is often remedied, so I trusted the process and kept going. Here is what coat one looked like on the front of the fridge.

Sticking with the front of the refrigerator door, I applied a second coat of the appliance paint in the same manner. Better, but far from good.
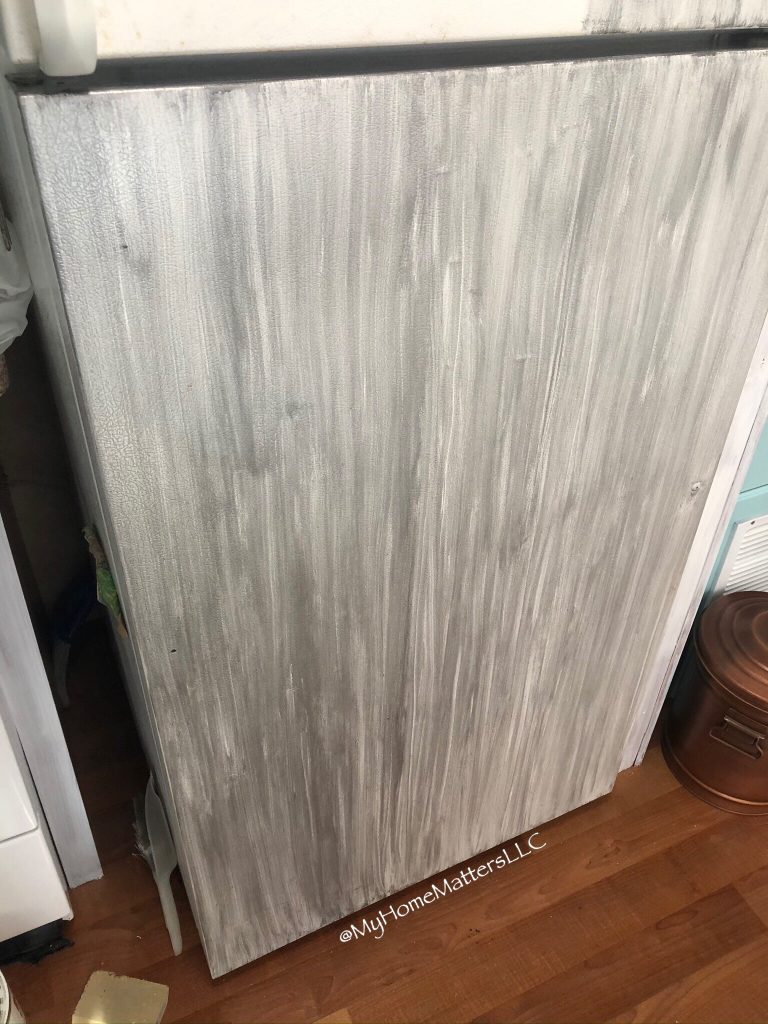
Coat number three made it look much better, but it was still quite streaky. It was at this point that I succumbed to the fact that I would have to wait another week until next trip when I could bring a foam roller.
That decision was well worth it! During this last trip, I applied coat four of the stainless steel appliance paint in the morning using the foam roller. It was cool enough that we could have all of the windows and doors open for the cross breeze to keep the smell to a minimum. While it still wasn't perfect, the roller was much better. But, it was still a bit tricky. You need to work with thin coats, but thin coats also means you see every start and stop point of the brush. So I experimented with the perfect amount of paint to put on the roller until I got a happy medium.
The other tricky part is that you do need to kind of go in the same direction. I found that working the typical "W" paint pattern as we are often told to do with regular wall painting caused too many streaks. Because of that, I tried to keep the roller going in the same direction.
I had taken the handles home to spray black during the week so, once the appliance paint was dry, I reattached them.

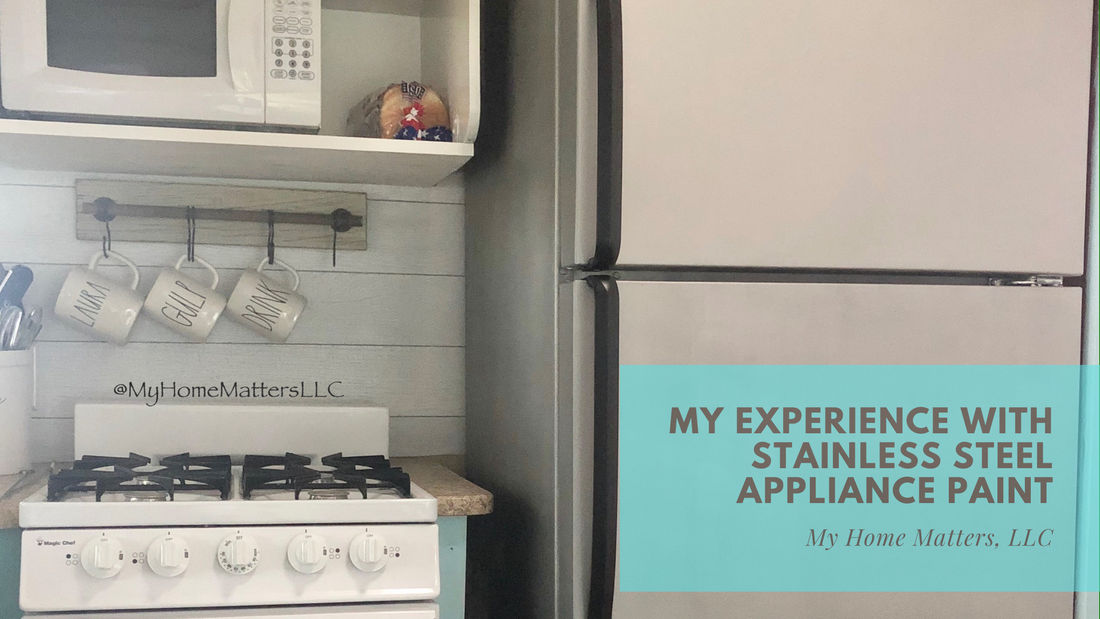
Overall, and especially for a camper, this made a huge difference! The fridge looks like brand new (unless you look really closely)! I had considered doing the stove/oven unit as well but there are a lot of pieces that would not be able to come off or that I'd want to spray black. If I spray some of those pieces, the writing will no longer be visible and that's not good. So, for now, I've decided to just live with mismatched appliances. The oven is in great shape and, maybe down the road, I'll change my mind. But for now, I'm happy with the results of the fridge!
(And do you want to know a little secret? I only painted the sides as far as you could see! One reason is that the fridge is bolted to the wall behind it. But the main reason is because no one will ever see that until we have to pitch our fridge due to no longer working. That's my story and I'm sticking to it! But the down side to this story is that eventually the fridge will have to come out if I want to finish that wall to the right of it and behind it. I suppose I'm just putting off the inevitable!)
Would you consider using appliance paint? Have you ever used it already? Do tell please! I'd love to know!
(This post may contain affiliate links which means that if you purchase a product from my link, I may receive a small commission. The good news is that this comes at no additional cost to you! Read my full privacy disclosure here: Privacy Notice)
Earlier this summer, I noticed stuff on our white full-sized refrigerator that was driving me nuts! I had never noticed it before and I thought it was some type of dirt from dirty little hands over time. I scrubbed and scrubbed and nothing was working to get it off. My husband said it was actually rust. Then the light bulb went off. My dad used stainless steel appliance paint several years ago to paint their appliances and I thought it was the coolest product! I had been wanting to try stainless steel appliance paint but have been hesitant in our own home. Our black appliances and smooth cook top seemed a bit daunting.
Ding ding ding! Maybe this was my chance! Plus, being that it was the camper fridge, I wasn't too worried if it wasn't perfect. So, I purchased this paint from Amazon and took a bunch of foam brushes up to the lake and went to town one evening.
Coat One Plus Mistake Number 1 (and 2)
While I did remove the handles right away and put them aside to bring home to spray black, I quickly realized I was using too small of a foam brush to apply the paint. But it was all I had quickly available, so I went with it anyway. Because the store means I would lose a good hour of time and I didn't want to waste any when I'm working up there - it just takes away from family time! I followed the instructions in terms of stirring and applied long even strokes as best I could with the little one-inch foam brush. I knew immediately this brush was too small and wished I had brought a foam roller like the instructions recommended.
My next mistake was starting too late in the day. This stuff stinks pretty badly and it did not allow enough time for the windows and fans to suck the smell out before we wanted to go to bed. It wasn't the most pleasant sleeping but it could have been worse and we survived.
Coat number one looked pretty much like a train wreck. But I didn't panic because that is often the case with a primer coat or first coat. With more coats, that is often remedied, so I trusted the process and kept going. Here is what coat one looked like on the front of the fridge.


Coats Two, Three and Four
Sticking with the front of the refrigerator door, I applied a second coat of the appliance paint in the same manner. Better, but far from good.

Coat number three made it look much better, but it was still quite streaky. It was at this point that I succumbed to the fact that I would have to wait another week until next trip when I could bring a foam roller.

That decision was well worth it! During this last trip, I applied coat four of the stainless steel appliance paint in the morning using the foam roller. It was cool enough that we could have all of the windows and doors open for the cross breeze to keep the smell to a minimum. While it still wasn't perfect, the roller was much better. But, it was still a bit tricky. You need to work with thin coats, but thin coats also means you see every start and stop point of the brush. So I experimented with the perfect amount of paint to put on the roller until I got a happy medium.

The other tricky part is that you do need to kind of go in the same direction. I found that working the typical "W" paint pattern as we are often told to do with regular wall painting caused too many streaks. Because of that, I tried to keep the roller going in the same direction.
Updated Handles and a Finished Product!
I had taken the handles home to spray black during the week so, once the appliance paint was dry, I reattached them.


Overall, and especially for a camper, this made a huge difference! The fridge looks like brand new (unless you look really closely)! I had considered doing the stove/oven unit as well but there are a lot of pieces that would not be able to come off or that I'd want to spray black. If I spray some of those pieces, the writing will no longer be visible and that's not good. So, for now, I've decided to just live with mismatched appliances. The oven is in great shape and, maybe down the road, I'll change my mind. But for now, I'm happy with the results of the fridge!

(And do you want to know a little secret? I only painted the sides as far as you could see! One reason is that the fridge is bolted to the wall behind it. But the main reason is because no one will ever see that until we have to pitch our fridge due to no longer working. That's my story and I'm sticking to it! But the down side to this story is that eventually the fridge will have to come out if I want to finish that wall to the right of it and behind it. I suppose I'm just putting off the inevitable!)

Would you consider using appliance paint? Have you ever used it already? Do tell please! I'd love to know!


2 comments
I have used appliance paint before! However, the paint I used was in a spray form. I actually used it twice. Both times, I used it on refrigerators. I may try this technique on my own refrigerator! Thanks for sharing!
Great job!! That camper will end up gorgeous..