
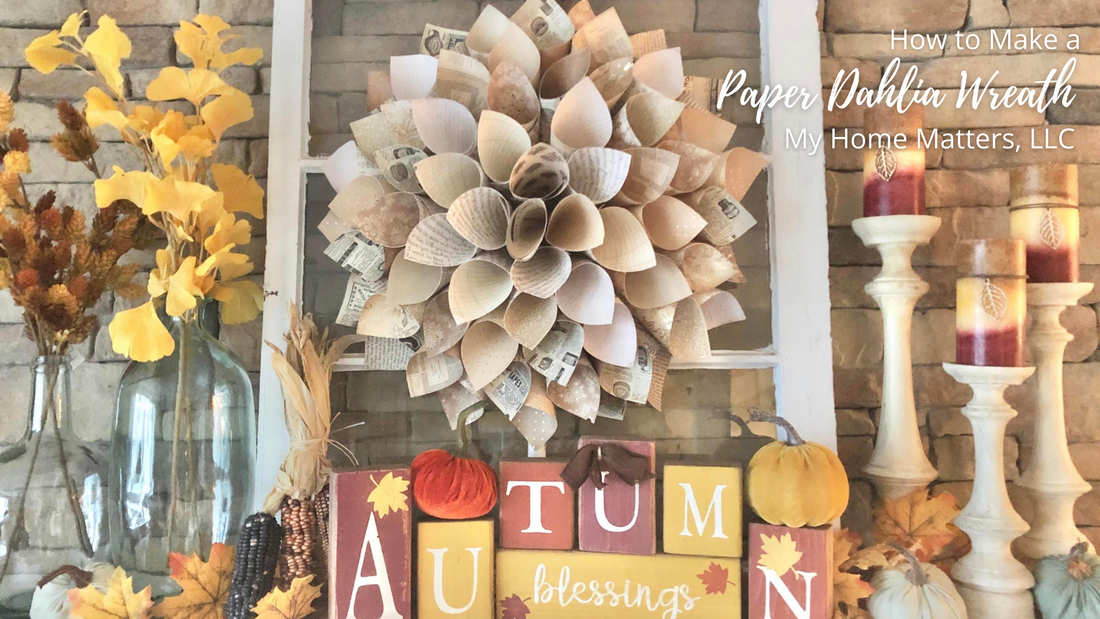
How to Make a Paper Dahlia Wreath
This week, I thought I'd share with you how I make a paper dahlia wreath. These can be done in so many different colors - after I did this one, I thought "Why didn't I do a holiday-themed one?" But I actually really love the colors of this one - I seriously wonder why do I do that to myself? Because rather than put it in the online shop, now I totally want to keep it! It matches my colors perfectly. Anyway... I'm going to show you how easy this is. And THEN I'm also going to attach a link to a video I did making one of these a couple of years ago.
The first step to making a paper dahlia wreath is to make sure you have all of the supplies, of course. You will need:
So the first step is to cut your 12x12 scrabbook paper into 6x6 quarters. I did not use all of my packet of paper. I used a total of 18 sheets (hmmm... now that I've counted, I suppose I could make an entirely new one out of the other half).


Once those are all cut, you will need to form lots of cone shapes for the paper dahlia wreath. Roll each quarter into a cone and put a line of hot glue along the edge to seal it (be careful not to put too much - you don't want to burn your fingerprints right off. I swear I have done this a few times!) After you seal each cone, form a little crease that is about 1/2 to 3/4 inches up from the tip of each one. (You may find that as you work your way in with each ring, you might need to make your creases a little higher up.)


Before going any further, take the cake board and mark a slit about one to one and a half inches long that is in from the edge about half an inch. Use scissors to shave that sliver out. This is where you will insert your ribbon. I cut my ribbon about 36 inches long so that I would have enough length to tie a small bow where it would hang at the top. TRUST ME - if you don't cut that sliver now and insert the ribbon, it's not much fun to do it once the whole wreath is made. (I may or may not have made that mistake myself...study the photos closely regarding this matter AHEM AHEM.) Once that slit is cut out, I wanted to smooth it out a little. So I added some blue tape by sliding a couple of pieces through and wrapping them downward and upward from the slit. (Note: if you cut the slit too close to the edge of the circle, the weight of the ribbon and wreath could cause tears in the cardboard and then come all the way through - which would be no fun to fix!)


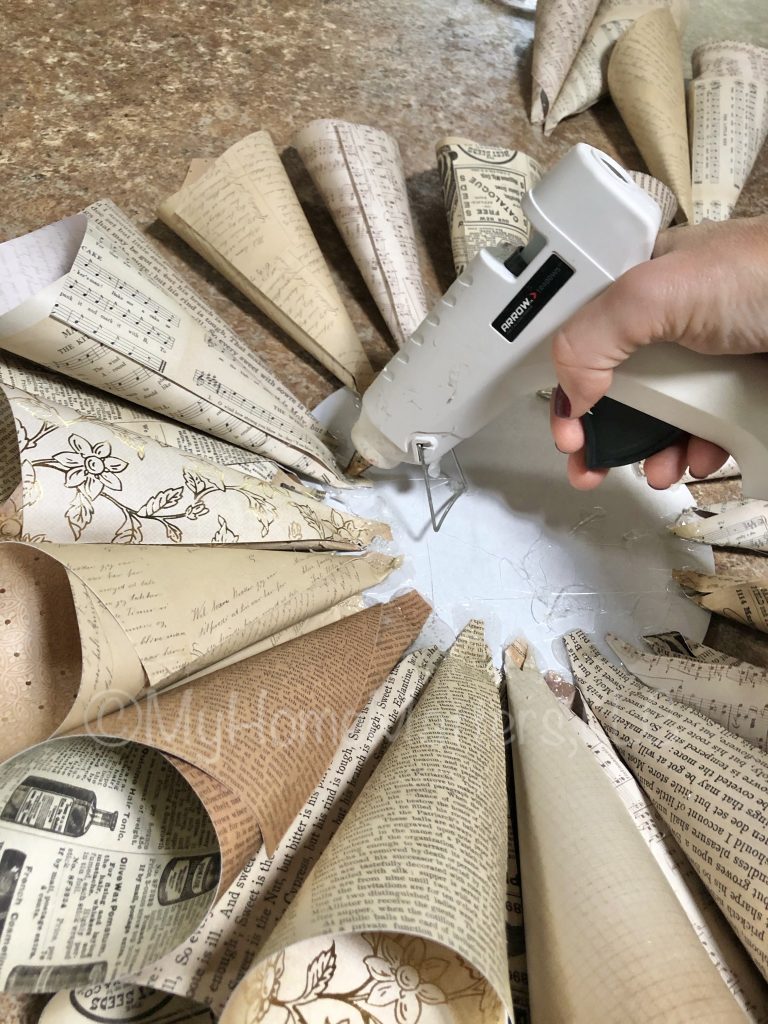
Next, lay out one ring of cones leaving a little space between them for the next layer to overlap. Make sure each cone is pointed towards the center of the cake board. You can try to do a pattern, but be prepared for that to not always work. It could vary a little with yours - I was trying to make it so that I had an equal number of each design all the way around. But I ended up needing one more cone to finish the circle. So, I just picked one and went with it. That means, for those who consider yourselves on the OCD side, it will be okay if the pattern gets disrupted! If you looked at mine and the first thing you thought was "Like OH-MY-GOSH, Becky... look at her B...adly patterned paper dahlia wreath" then, well, I got nothin' except you will need to do way more planning than I desire to ever do for mine!
If you will be able to sleep peacefully at night knowing that the patterns may not work out to be used the exact number of times as you'd like, then go ahead and start going around the circle, one at a time, adding hot glue to the under side of each creased cone end and gluing it down to the board. Continue around the entire circle. I used 17 cones for this layer. I also folded my cones so that some had the pattern on one side facing out and some had the other side's pattern facing out.


Now, move on to the next layer by doing the exact same thing but sliding the cones in just a little bit (towards the center of the cake board) and nestling them in overlapping the first ring. Continue this process until your cones start to stick almost straight out. I like to use the glue gun itself to press down the cone ends into the hot glue because it saves my fingers. This is where it gets more difficult to get in there. So that glue gun worked well for me. And then when I got to that last one, I stuck a glue stick down in to the center to press the last ones in!


Once you have all of your cones glued in well, it's time to hang it. Tie a bow making your ribbon to the desired length and hang! Oh, wait... where is a good place to hang a paper dahlia wreath? Well, definitely not on a front door exposed to weather. This one is also fairly thick. I like to layer mine on something else - for instance, the old window over my mantel (my old go-to, if you know me at all).

But another place to hang these is in front of something more rustic like a barn door. Here's a photo of the one I did in this video hanging in front of a barn door I made. It's a great addition to a wall collage, too! This one is slightly smaller because I used a traced cardboard cutout of a DVD.


Will you be trying to make one? Please let me know if this post (and/or video) was helpful! (Here's a pin for you to save if you'd like to make one this Fall...)
Supplies Needed
The first step to making a paper dahlia wreath is to make sure you have all of the supplies, of course. You will need:
- scrapbook paper that is printed on both sides (I got mine from Joann fabric when it was on sale)
- hot glue gun (many of the tutorials that use book pages use double sided tape but I found that did not hold well enough for the heavier card stock paper I used)
- a round cake board (mine was 8-inches in diameter) but you could also trace a DVD like I show to do in the video version
- scissors
- ribbon that coordinates with the paper (for hanging)
- paper cutter (not required but it makes it much easier!)

Step 1
So the first step is to cut your 12x12 scrabbook paper into 6x6 quarters. I did not use all of my packet of paper. I used a total of 18 sheets (hmmm... now that I've counted, I suppose I could make an entirely new one out of the other half).
Step 2
Once those are all cut, you will need to form lots of cone shapes for the paper dahlia wreath. Roll each quarter into a cone and put a line of hot glue along the edge to seal it (be careful not to put too much - you don't want to burn your fingerprints right off. I swear I have done this a few times!) After you seal each cone, form a little crease that is about 1/2 to 3/4 inches up from the tip of each one. (You may find that as you work your way in with each ring, you might need to make your creases a little higher up.)
Step 3
Before going any further, take the cake board and mark a slit about one to one and a half inches long that is in from the edge about half an inch. Use scissors to shave that sliver out. This is where you will insert your ribbon. I cut my ribbon about 36 inches long so that I would have enough length to tie a small bow where it would hang at the top. TRUST ME - if you don't cut that sliver now and insert the ribbon, it's not much fun to do it once the whole wreath is made. (I may or may not have made that mistake myself...study the photos closely regarding this matter AHEM AHEM.) Once that slit is cut out, I wanted to smooth it out a little. So I added some blue tape by sliding a couple of pieces through and wrapping them downward and upward from the slit. (Note: if you cut the slit too close to the edge of the circle, the weight of the ribbon and wreath could cause tears in the cardboard and then come all the way through - which would be no fun to fix!)
Step 4
Next, lay out one ring of cones leaving a little space between them for the next layer to overlap. Make sure each cone is pointed towards the center of the cake board. You can try to do a pattern, but be prepared for that to not always work. It could vary a little with yours - I was trying to make it so that I had an equal number of each design all the way around. But I ended up needing one more cone to finish the circle. So, I just picked one and went with it. That means, for those who consider yourselves on the OCD side, it will be okay if the pattern gets disrupted! If you looked at mine and the first thing you thought was "Like OH-MY-GOSH, Becky... look at her B...adly patterned paper dahlia wreath" then, well, I got nothin' except you will need to do way more planning than I desire to ever do for mine!
If you will be able to sleep peacefully at night knowing that the patterns may not work out to be used the exact number of times as you'd like, then go ahead and start going around the circle, one at a time, adding hot glue to the under side of each creased cone end and gluing it down to the board. Continue around the entire circle. I used 17 cones for this layer. I also folded my cones so that some had the pattern on one side facing out and some had the other side's pattern facing out.
Step 5
Now, move on to the next layer by doing the exact same thing but sliding the cones in just a little bit (towards the center of the cake board) and nestling them in overlapping the first ring. Continue this process until your cones start to stick almost straight out. I like to use the glue gun itself to press down the cone ends into the hot glue because it saves my fingers. This is where it gets more difficult to get in there. So that glue gun worked well for me. And then when I got to that last one, I stuck a glue stick down in to the center to press the last ones in!
Step 6
Once you have all of your cones glued in well, it's time to hang it. Tie a bow making your ribbon to the desired length and hang! Oh, wait... where is a good place to hang a paper dahlia wreath? Well, definitely not on a front door exposed to weather. This one is also fairly thick. I like to layer mine on something else - for instance, the old window over my mantel (my old go-to, if you know me at all).
But another place to hang these is in front of something more rustic like a barn door. Here's a photo of the one I did in this video hanging in front of a barn door I made. It's a great addition to a wall collage, too! This one is slightly smaller because I used a traced cardboard cutout of a DVD.
Will you be trying to make one? Please let me know if this post (and/or video) was helpful! (Here's a pin for you to save if you'd like to make one this Fall...)
2 comments
I’ve always wanted to make one of these dahlias with old sheets of music! I appreciate your step by step guide. I honestly had no idea where to start with it. Hopefully I can make one soon!
I love this wreath and think it would be a perfect gift for a book lover. Would live to make my mom one with pages from an old hymnal. I think she would love that