Lake Life - DIY Painted Chargers
Camp (or as I like to call it..."lake life") on Lake Erie has taken on a whole new feel for me ever since our camper reno two years ago. The fact that I'm writing a blog post about DIY painted chargers for our camper is surprising. I mean I rarely did anything for "camp" prior to renovating inside! It's a home away from home now. And, even though it was before, the renovation just "feels" like a home rather than a trailer now. I think that is what gives me all the warm and fuzzy feels.
This year, I've been working on updates on the outside of our camper (we have a permanent spot so our camper does not move). Follow me on Instagram and check out the progress on the deck here. Over the last few weeks, not only did the boys and I replace our deck railing, but I have also stained 1/4 of the deck (it's like 20 years old and never been stained!), and stained our picnic table. Oh, and that snowballed into doing some landscaping as well!
To be honest, our table was kind of embarssing. It was so worn and weathered. But the stain has made it completely look brand new! (Perhaps that's another blog post for later...) As a result, I have been inspired to fool around with lots of different outdoor tablescapes! Today, I'm sharing how I made these DIY nautical charging plates to match our beachy blue decor and bring the inside colors outside.
https://youtu.be/Lg7KmXLubio
If desired? You might be thinking... "Isn't the title of this blog post DIY Painted Chargers?" Technically, you could skip the background painting and just use the chargers as is. You could skip to step 3 but you'd still be painting in that step. That's why I say this step is optional. I needed about three total coats of the white chalk paint on my silver chargers. (I could have done 4 coats.) Be sure to give lots of dry time in between coats. Not allowing enough dry time will mean you will likely have trouble with the first coats coming off and then having a hard time re-covering those spots.


Lightly sand with 220 grit or higher sand paper or sanding block. Do this over the center of the chargers to remove any "grit" and make the stenciling process go more smoothly. (This will reduce the possibility of paint bleed which means it will help the paint not bleed under the stencil.)

If you are using a plastic stencil, the risk of bleeding is higher. I don't have a ton of experience using plastic reusable stencils, so I don't have a ton of advice for preventing bleed-under. If you are using a one-time use stencil made from a Cricut or Silhouette or other vinyl cutting machine, this is what I used on my project. I wasn't sure if I wanted them all to be the same (I had one design prepared for that) or all four different. Ultimately, I went out of my comfort zone and did each one different!
This depends on what stencils you are using but, with the stencils we sell in our online shop, we like to apply Mod Podge once the stencil is stuck on in order to help reduce the likelihood of the paint sneaking under the vinyl.
Once that Mod Podge is dry (about 10 minutes later), we then apply the paint color. I was using the color Calypso Sky by Folk Art for my beachy blue. You also want to be sure to peel that stencil off before the paint dries to avoid the paint adhering to the stencil itself. That step is CRUCIAL!


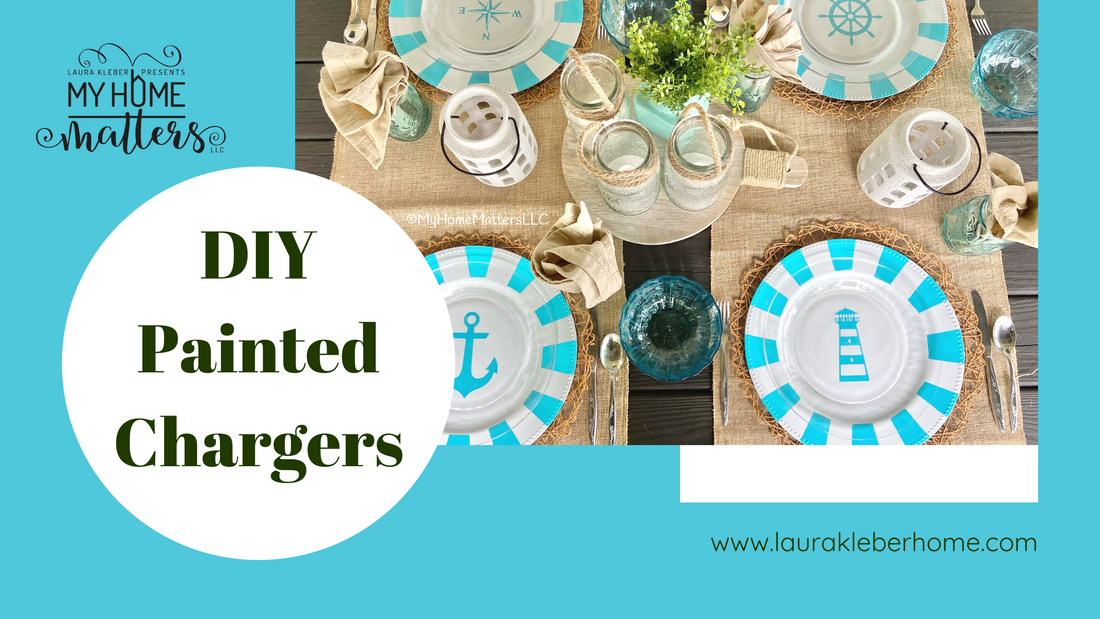
This step is completely a matter of preference, of course. I decided I wanted to up my nautical game by adding stripes around the outer edge of the charger and I did that with blue tape. The Dollar Tree chargers have a beaded design around the outer edge and I basically counted beads all the way around to try to get some sense of how big the stripes could be. Some are "8 beads" wide, others are seven, and yet others are only "6 beads wide." I just made sure that the ones that were eight were directly across from each other and the same with the six and sevens.


You could seal your chargers with spray (this was the least time consuming for me) or you could use the Mod Podge from the stenciling step and just brush it on. This step makes the chargers feel wipeable and "finished" and will protect them from scratches and spills.

You can do this with so many different designs... something for all seasons! The best part is that you can even find the supplies at Dollar Tree and the clear plates work with all of your designs! Would you try this project? If so, what season would you want to design for... or would you choose something for all year long?


The backstory...
This year, I've been working on updates on the outside of our camper (we have a permanent spot so our camper does not move). Follow me on Instagram and check out the progress on the deck here. Over the last few weeks, not only did the boys and I replace our deck railing, but I have also stained 1/4 of the deck (it's like 20 years old and never been stained!), and stained our picnic table. Oh, and that snowballed into doing some landscaping as well!
To be honest, our table was kind of embarssing. It was so worn and weathered. But the stain has made it completely look brand new! (Perhaps that's another blog post for later...) As a result, I have been inspired to fool around with lots of different outdoor tablescapes! Today, I'm sharing how I made these DIY nautical charging plates to match our beachy blue decor and bring the inside colors outside.
https://youtu.be/Lg7KmXLubio
Supplies Needed for your DIY Painted Chargers:
- chargers (I got mine from Dollar Tree)
- clear dishes (also from Dollar Tree)
- Chalk Paint (I used Waverly brand simply because my daughter was heading to Walmart and I didn't have any at the camper!)
- Liquid Mod Podge (any sheen will do but I use Matte)
- Spray Mod Podge (sheen is up to you but I used Matte for this as well)
- Stencils of your choice (I printed my own)
- Paint brush and application (makeup) sponges

Step 1: Paint your charger backgrounds, if desired.
If desired? You might be thinking... "Isn't the title of this blog post DIY Painted Chargers?" Technically, you could skip the background painting and just use the chargers as is. You could skip to step 3 but you'd still be painting in that step. That's why I say this step is optional. I needed about three total coats of the white chalk paint on my silver chargers. (I could have done 4 coats.) Be sure to give lots of dry time in between coats. Not allowing enough dry time will mean you will likely have trouble with the first coats coming off and then having a hard time re-covering those spots.
Step 2: Lightly sand.
Lightly sand with 220 grit or higher sand paper or sanding block. Do this over the center of the chargers to remove any "grit" and make the stenciling process go more smoothly. (This will reduce the possibility of paint bleed which means it will help the paint not bleed under the stencil.)
Step 3: Stencil your designs.
If you are using a plastic stencil, the risk of bleeding is higher. I don't have a ton of experience using plastic reusable stencils, so I don't have a ton of advice for preventing bleed-under. If you are using a one-time use stencil made from a Cricut or Silhouette or other vinyl cutting machine, this is what I used on my project. I wasn't sure if I wanted them all to be the same (I had one design prepared for that) or all four different. Ultimately, I went out of my comfort zone and did each one different!
The stenciling process...
This depends on what stencils you are using but, with the stencils we sell in our online shop, we like to apply Mod Podge once the stencil is stuck on in order to help reduce the likelihood of the paint sneaking under the vinyl.
Once that Mod Podge is dry (about 10 minutes later), we then apply the paint color. I was using the color Calypso Sky by Folk Art for my beachy blue. You also want to be sure to peel that stencil off before the paint dries to avoid the paint adhering to the stencil itself. That step is CRUCIAL!
Step 4 (if desired): Add stripes.
This step is completely a matter of preference, of course. I decided I wanted to up my nautical game by adding stripes around the outer edge of the charger and I did that with blue tape. The Dollar Tree chargers have a beaded design around the outer edge and I basically counted beads all the way around to try to get some sense of how big the stripes could be. Some are "8 beads" wide, others are seven, and yet others are only "6 beads wide." I just made sure that the ones that were eight were directly across from each other and the same with the six and sevens.
Step 5: Seal the chargers.
You could seal your chargers with spray (this was the least time consuming for me) or you could use the Mod Podge from the stenciling step and just brush it on. This step makes the chargers feel wipeable and "finished" and will protect them from scratches and spills.
Step 6: Decorate and enjoy!
You can do this with so many different designs... something for all seasons! The best part is that you can even find the supplies at Dollar Tree and the clear plates work with all of your designs! Would you try this project? If so, what season would you want to design for... or would you choose something for all year long?