DIY Lemon Napkin Rings
When I saw the most beautiful lemon napkin rings on Etsy, I decided I wanted to attempt to make some myself. My husband and I brainstormed the best way to form the inner core. After thinking PVC piping might work best, a lightbulb went off in my head about using sturdier pieces of cardboard similar to a paper towel holder. If only I had a 2 inch cardboard tube mailer just lying around! Can you believe my husband actually had one in his office? So, today I'm going to take you through the steps on how I made these lemon napkin rings. (This post does contain some affiliate links. Ready my full privacy policy here: Privacy Notice.)
https://youtu.be/VFSPTAPtyr8

If you don't want to use the cardboard tube mailer, you could use PVC piping and just paint it a neutral color, similar to the rope color. Fortunately, I have the ability to cut the tube mailer myself so I measured out about how wide each piece would have to be. With 7/8 inches as my measurement, it was time to measure and cut all the pieces. I cut twelve in total working my way in from both ends so that I could stay away from the stickers on the middle.


Now that I had them all cut, I had another thing to figure out. The fraying! Not to mention, I didn't really want to be able to see that the insides of each ring were actually just cardboard. So, the solution was some 3/8 inch neutral colored ribbon. I simply wrapped the ribbon around and around using hot glue to secure it on the inside or each pass. The inside appearance was my focus, more so than the outside since I knew that would be covered with the rope.


Now that the cardboard has been finished off, it is time to start gluing the nautical rope around in three concentric circles. Be careful to keep the roping pretty tight to the prior circle as you go. Once I got to the end, I cut the rope off at a slight angle and hot glued it as tightly as possible to keep those ends from fraying apart.


Using more hot glue, start by putting a layer on right over where the starting and ending pieces of rope come together. You will want to hide this part with the greens and lemons. I started by gluing two cut pieces of the greens in opposite directions. Fairly easily, I was able to press them down until they were going to stay. From there, I added three short sprigs of the white greens (two in opposite directions over the greens and a third going perpendicular). Finally, put a good amount of glue on top of all of that in the center and press on two of the lemons. You will have time to adjust them but keep pushing on them until they stay in place. You can always go back and add more hot glue at the base and around the lemons and greens for more stability.


I set up one sample tablesetting just for fun since I just finished these up last night. But I can't wait to do a full out lemon themed table scape! I'll be back with another blog post on that in the future. Lemons look good with limes (the color AND the fruit!), greens, neutrals, blacks and whites. So the options are many! I hope you enjoyed this DIY lemon napkin ring project. Let me know if you try some!


https://youtu.be/VFSPTAPtyr8
Supplies I used:
- 2 inch cardboard mailer tube
- greens from Amazon
- lemons (also from Amazon)
- neutral colored 3/8' ribbon
- hot glue and glue gun
- nautical twine from the Dollar Tree
- sprigs of white from a piece I found at my local At Home store
Determine what you will use as support under the nautical twine...
If you don't want to use the cardboard tube mailer, you could use PVC piping and just paint it a neutral color, similar to the rope color. Fortunately, I have the ability to cut the tube mailer myself so I measured out about how wide each piece would have to be. With 7/8 inches as my measurement, it was time to measure and cut all the pieces. I cut twelve in total working my way in from both ends so that I could stay away from the stickers on the middle.
Oh... but what about that fraying that happened?
Now that I had them all cut, I had another thing to figure out. The fraying! Not to mention, I didn't really want to be able to see that the insides of each ring were actually just cardboard. So, the solution was some 3/8 inch neutral colored ribbon. I simply wrapped the ribbon around and around using hot glue to secure it on the inside or each pass. The inside appearance was my focus, more so than the outside since I knew that would be covered with the rope.
Add the roping!
Now that the cardboard has been finished off, it is time to start gluing the nautical rope around in three concentric circles. Be careful to keep the roping pretty tight to the prior circle as you go. Once I got to the end, I cut the rope off at a slight angle and hot glued it as tightly as possible to keep those ends from fraying apart.
Let's make these look like pretty lemon napkin rings now!
Using more hot glue, start by putting a layer on right over where the starting and ending pieces of rope come together. You will want to hide this part with the greens and lemons. I started by gluing two cut pieces of the greens in opposite directions. Fairly easily, I was able to press them down until they were going to stay. From there, I added three short sprigs of the white greens (two in opposite directions over the greens and a third going perpendicular). Finally, put a good amount of glue on top of all of that in the center and press on two of the lemons. You will have time to adjust them but keep pushing on them until they stay in place. You can always go back and add more hot glue at the base and around the lemons and greens for more stability.
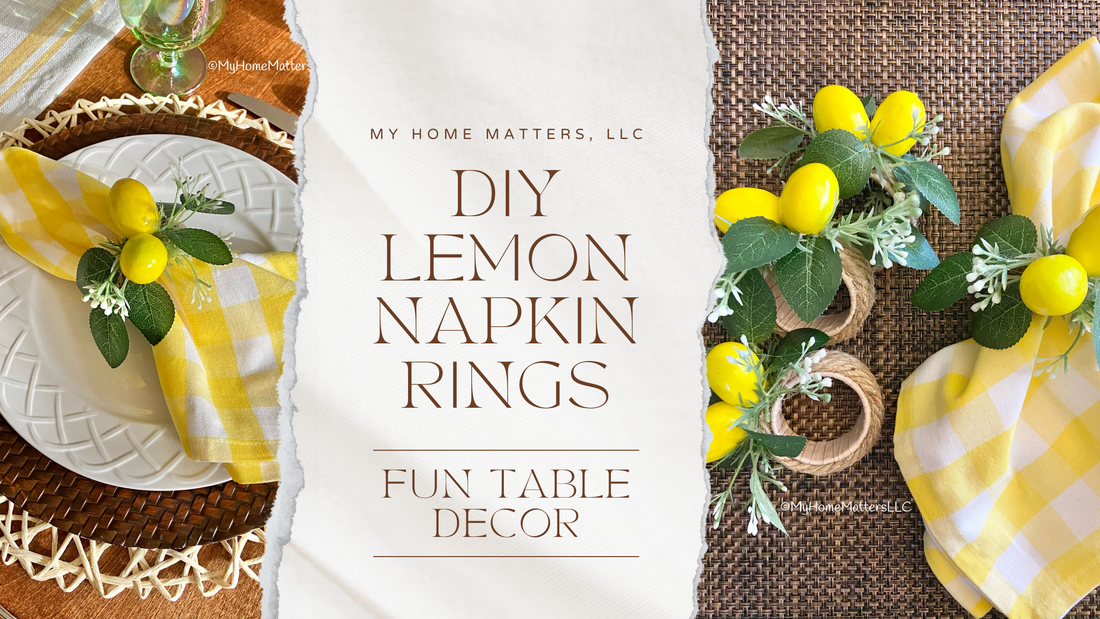
Now it's time to decorate the table!
I set up one sample tablesetting just for fun since I just finished these up last night. But I can't wait to do a full out lemon themed table scape! I'll be back with another blog post on that in the future. Lemons look good with limes (the color AND the fruit!), greens, neutrals, blacks and whites. So the options are many! I hope you enjoyed this DIY lemon napkin ring project. Let me know if you try some!
1 comment
Very pretty. You have such a creative mind.