
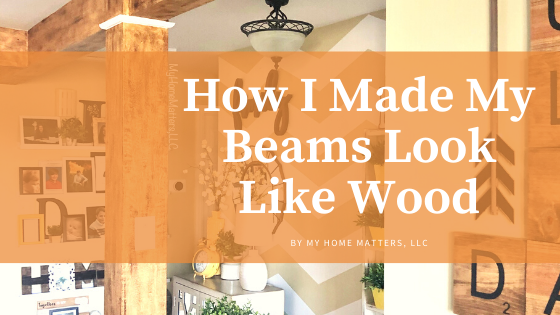
Creating the Appearance of Wood Beams
Wood beams have always been swoon-worthy for me. But with low ceilings and drywall already covering the ones we have, it seemed out of reach for us...until recently. For a while now, I've been making lists of ways that we can add more character to our home. One of the things on my list was making the headers we currently have look like wood. Our home is half established 1955 and half established 2009. The living room is right where some of our main additions took place along with opening up a wall. Opening up that wall meant we were left with a header there as well as in our (very small) entry way. I wanted the column to also look like wood.
***This blog post contains affiliate links which means, if you should purchase an item using one of my links, I will get a small commission. However, it comes at no additional cost to you. Feel free to read my full Privacy Notice***
After debating and researching how to wrap the beams with wood, there seemed too many challenges. One of the challenges was the fact that the column has some trim around it that I did not want to have to fool with. It also meant that the beams would then stick out further than the walls themselves. I wasn't sure how authentic that might look. Ultimately, I decided to go the route of paint and wax and I'm going to tell you my step-by-step process for achieving this look! Let's start with a before photo. (Note: the chevron wall is going to go away soon in order to "de-busify." That will be another project coming soon).
I did learn something that could have allowed me to use much less in terms of wax (I mention that later). But here's what I used in order to create the look of wood beams...
The color I used for this was called Spun Gold 3001-5C. I literally took a stab in the dark with this color but did zero in on the colors that had both yellow and orange. This seemed like it would take less time (and be less expensive) than using an orange AND a yellow. Valspar Signature paint is my favorite and I chose to go with a matte finish. I wasn't sure if the ones with more sheen would not allow the waxes to absorb as much.
Valspar might be my favorite paint with which to work but you could get anything you want in terms of brand. I love the look of the Minwax stain called Early American. This particular stain has an orangish undtertone, and my floors also have a yellow-ish orange hue to them. I just kept trying to gravitate towards those same tones. My kitchen cabinets also have a two-toned stain so this felt like the right route for ME. You, however, could play around with different looks and colors on some sample boards before diving in like I did. Whatever color you decide to use as your base coat, allow it to dry once you've painted.
I mixed about 1/4 dark wax with about 3/4 clear wax to achieve the amount of darkness I was going for... At first, I started out with straight dark wax but felt it was TOO dark for my liking. So I lightened it up and found the right mix for my taste. This is a photo of me just starting to mix the two waxes together.
It took a pretty generous amount of wax mixture when I applied it to the walls. I used strokes that went in the direction I would expect to see on a real wood beam. So, for the ceiling beams, that meant horizontally and for the post, of course, that was vertically. It seemed easiest to work in sections that were about two feet at a time.


First, I worked the wax over the entire section all the way up to the ceiling by pressing it into the blue tape as far up as I could go. Then I stepped down and back to see how that looked (it will "take" more in some sections than others).
It helped to keep a little bit of straight dark wax on a plate and, in certain spots, I added a little of that in kind of a dry-brush motion. What I mean by that is that I worked the brush across the existing wax very lightly so that it looked rough. Now that I think back on the process, I think another chip brush would have worked even better for this part as chip brushes are great for dry brushing! Their rough bristles allow gaps in the paint so that you do not get a ton of coverage unless you really saturate the brush with paint..
Normally, when I paint, it's frustrating when the drywall is uneven. Our old ceilings in the living room show every flaw. But, on these beams, I was doing a little happy dance every time there was some kind of "character mark" because those made the area look even more like a real wood beam! I just kept working a little section at a time, adding some darkness in spots, doing the underside, of course, and then the other side.

I took a couple of different graining tools that I have had for a while and used them to make random marks and lines in the wax. These tools are intended for stains and thinner paints but they still worked for this project! Since wax is thick, it would goop up my tools pretty quickly. I kept baby wipes on hand as I moved along and used them to keep wiping out the tools. The lines should be uneven and random so that made things easy! I wanted everything to look as authentic to real wood beams as I could.

For this step, I made sure to hold a paper plate underneath since it was the step that allowed me to "knock off" all the excess wax and pieces sticking out. Normally I would buff things out as best I can with this brush as well as lint free buffing cloths BUT I actually wanted the uneven look. For furniture, it's a totally different ball game! Wax was flying a bit in this step so I had to make sure my furniture was covered. I also kept checking the floors to be sure I wasn't stepping on wax. Luckily our floors in this area are hardwood so I could wipe it up immediately with a baby wipe. I would recommend being super cautious if doing this on carpet and covering it with drop cloths!
I'm not going to lie. Standing on the step stool (our ceilings are only 8 feet so I did not need a regular ladder) and looking up coupled with the goofy way I was tilted to the side at the same time really left my back and neck screaming after night one. Thankfully, I ran out of wax and was forced to stop and take a break for the rest of the night.
I was actually up Saturday morning with no problems because I wanted to go check out what my work looked like so far in the daylight. Did they look as much like wood beams as they did when I went to bed the night before? I couldn't wait to go see! I was super happy with the look so far and planned to go get more wax after what normally is the first basketball game of the day. Due to a sick little one who had absolutely no desire to play in his game (NOR should he have), that meant I had the rest of the afternoon to finish this bad boy project up! However, I did feel super bad for my little guy. He's still not totally back to himself.
When I went for more wax, my Annie Sloan stockist, Laura, at The Backdoor Furnishings, suggested that I could have used some mineral spirits to thin out the wax and make it more like a glaze. DUH! Why didn't I think of that? It would have allowed it to be less "goopy" and I likely would have used WAY less of the wax. For this project, I probably used an entire can of clear wax and 1/4-1/2 can of the dark wax by the time all was said and done. As for the paint, I probably only used about 1/4 of the can. But being that I didn't want to do half of the project one way and half of it another, I kept going the way I had started.
As I have lived with it for a couple of days now, I'm still thinking on ways to just add a touch more to them to feel more realistic. But, overall, I'm very happy with how they came out. The best part about it is that it was low mess AND low stress! And, if I really wanted to down the road, I could paint over it all again. I was worried it may make the ceilings look a little lower (and we don't need that with only having 8-foot ceilings as it is) but I don't feel that way. I love the added warmth it brings to the space! Lucky, on the other hand, is totally indifferent and completely used to ongoing projects around here. Sheesh, Lucky. Good thing tomorrow is grooming day! You're looking quite ragged!


One thing that did bother me once it was all done was my little console table that sits behind the sofa that divides our kitchen and living spaces. I purchased this piece at our local At Home store. It stuck out to me now that it was "sandwiched" between the new wood beam and the floor. While I did like the color wash that was on that piece of furniture (shown in the before picture earlier), I didn't like how it clashed with the tones in the beams and floor. If you caught me live on Facebook on Sunday evening, you saw me in a spontaneous paint moment where I decided to dry brush black onto that piece. I kept it looking rustic. I'm not married to the look quite yet so I'm living with it for a bit first. But I do feel like it goes better in the room now since it brings out the dark tones of the other sofa as well as the television.

Am I the only one who starts one project and it spirals into several other projects (not necessarily planned)? Here's one more of the before...and after...
Oh how I could just do project after project... there's just something about making a house into a place where you are comfortable and cozy and happy. What's on your project list these days?
Purchasing Information:
***This blog post contains affiliate links which means, if you should purchase an item using one of my links, I will get a small commission. However, it comes at no additional cost to you. Feel free to read my full Privacy Notice***
I First Considered Other Options...
After debating and researching how to wrap the beams with wood, there seemed too many challenges. One of the challenges was the fact that the column has some trim around it that I did not want to have to fool with. It also meant that the beams would then stick out further than the walls themselves. I wasn't sure how authentic that might look. Ultimately, I decided to go the route of paint and wax and I'm going to tell you my step-by-step process for achieving this look! Let's start with a before photo. (Note: the chevron wall is going to go away soon in order to "de-busify." That will be another project coming soon).
Supplies I Used
I did learn something that could have allowed me to use much less in terms of wax (I mention that later). But here's what I used in order to create the look of wood beams...
- Valspar Paint (I chose a yellowish-orange color - see below - totally random but it ended up being perfect for what I was wanting to achieve!)
- Chip Brush
- Annie Sloan Dark Wax
- Annie Sloan Clear Wax
- Graining Tools
- Baby Wipes
- Waxing Brushes

Step 1: Tape off your ceilings and any areas on which you don't want to get paint or wax. Also, tape off where the ends of your "wood beams" will be. Paint the yellowish-orange on all areas that are to end up looking like wood beams in the end.
The color I used for this was called Spun Gold 3001-5C. I literally took a stab in the dark with this color but did zero in on the colors that had both yellow and orange. This seemed like it would take less time (and be less expensive) than using an orange AND a yellow. Valspar Signature paint is my favorite and I chose to go with a matte finish. I wasn't sure if the ones with more sheen would not allow the waxes to absorb as much.
You do not have to get perfect coverage with this base coat color. That is why I used a chip brush!
Valspar might be my favorite paint with which to work but you could get anything you want in terms of brand. I love the look of the Minwax stain called Early American. This particular stain has an orangish undtertone, and my floors also have a yellow-ish orange hue to them. I just kept trying to gravitate towards those same tones. My kitchen cabinets also have a two-toned stain so this felt like the right route for ME. You, however, could play around with different looks and colors on some sample boards before diving in like I did. Whatever color you decide to use as your base coat, allow it to dry once you've painted.
Step 2: Start to Apply the Wax
I mixed about 1/4 dark wax with about 3/4 clear wax to achieve the amount of darkness I was going for... At first, I started out with straight dark wax but felt it was TOO dark for my liking. So I lightened it up and found the right mix for my taste. This is a photo of me just starting to mix the two waxes together.
It Took More Wax Than I Thought.
It took a pretty generous amount of wax mixture when I applied it to the walls. I used strokes that went in the direction I would expect to see on a real wood beam. So, for the ceiling beams, that meant horizontally and for the post, of course, that was vertically. It seemed easiest to work in sections that were about two feet at a time.
First, I worked the wax over the entire section all the way up to the ceiling by pressing it into the blue tape as far up as I could go. Then I stepped down and back to see how that looked (it will "take" more in some sections than others).
Keep Some Extra Dark Wax on Hand
It helped to keep a little bit of straight dark wax on a plate and, in certain spots, I added a little of that in kind of a dry-brush motion. What I mean by that is that I worked the brush across the existing wax very lightly so that it looked rough. Now that I think back on the process, I think another chip brush would have worked even better for this part as chip brushes are great for dry brushing! Their rough bristles allow gaps in the paint so that you do not get a ton of coverage unless you really saturate the brush with paint..
A pleasant surprise!
Normally, when I paint, it's frustrating when the drywall is uneven. Our old ceilings in the living room show every flaw. But, on these beams, I was doing a little happy dance every time there was some kind of "character mark" because those made the area look even more like a real wood beam! I just kept working a little section at a time, adding some darkness in spots, doing the underside, of course, and then the other side.
Step 3 (Do this as you go and not after you've finished all of the waxing!)
I took a couple of different graining tools that I have had for a while and used them to make random marks and lines in the wax. These tools are intended for stains and thinner paints but they still worked for this project! Since wax is thick, it would goop up my tools pretty quickly. I kept baby wipes on hand as I moved along and used them to keep wiping out the tools. The lines should be uneven and random so that made things easy! I wanted everything to look as authentic to real wood beams as I could.
Step 4: I used the flat waxing brush to smooth things out and get rid of excess wax.
For this step, I made sure to hold a paper plate underneath since it was the step that allowed me to "knock off" all the excess wax and pieces sticking out. Normally I would buff things out as best I can with this brush as well as lint free buffing cloths BUT I actually wanted the uneven look. For furniture, it's a totally different ball game! Wax was flying a bit in this step so I had to make sure my furniture was covered. I also kept checking the floors to be sure I wasn't stepping on wax. Luckily our floors in this area are hardwood so I could wipe it up immediately with a baby wipe. I would recommend being super cautious if doing this on carpet and covering it with drop cloths!
Noteworthy details...
I'm not going to lie. Standing on the step stool (our ceilings are only 8 feet so I did not need a regular ladder) and looking up coupled with the goofy way I was tilted to the side at the same time really left my back and neck screaming after night one. Thankfully, I ran out of wax and was forced to stop and take a break for the rest of the night.
And more details...
I was actually up Saturday morning with no problems because I wanted to go check out what my work looked like so far in the daylight. Did they look as much like wood beams as they did when I went to bed the night before? I couldn't wait to go see! I was super happy with the look so far and planned to go get more wax after what normally is the first basketball game of the day. Due to a sick little one who had absolutely no desire to play in his game (NOR should he have), that meant I had the rest of the afternoon to finish this bad boy project up! However, I did feel super bad for my little guy. He's still not totally back to himself.
And even more details...
When I went for more wax, my Annie Sloan stockist, Laura, at The Backdoor Furnishings, suggested that I could have used some mineral spirits to thin out the wax and make it more like a glaze. DUH! Why didn't I think of that? It would have allowed it to be less "goopy" and I likely would have used WAY less of the wax. For this project, I probably used an entire can of clear wax and 1/4-1/2 can of the dark wax by the time all was said and done. As for the paint, I probably only used about 1/4 of the can. But being that I didn't want to do half of the project one way and half of it another, I kept going the way I had started.
Final Pictures
As I have lived with it for a couple of days now, I'm still thinking on ways to just add a touch more to them to feel more realistic. But, overall, I'm very happy with how they came out. The best part about it is that it was low mess AND low stress! And, if I really wanted to down the road, I could paint over it all again. I was worried it may make the ceilings look a little lower (and we don't need that with only having 8-foot ceilings as it is) but I don't feel that way. I love the added warmth it brings to the space! Lucky, on the other hand, is totally indifferent and completely used to ongoing projects around here. Sheesh, Lucky. Good thing tomorrow is grooming day! You're looking quite ragged!
One Project Always Leads to Others, Right?
One thing that did bother me once it was all done was my little console table that sits behind the sofa that divides our kitchen and living spaces. I purchased this piece at our local At Home store. It stuck out to me now that it was "sandwiched" between the new wood beam and the floor. While I did like the color wash that was on that piece of furniture (shown in the before picture earlier), I didn't like how it clashed with the tones in the beams and floor. If you caught me live on Facebook on Sunday evening, you saw me in a spontaneous paint moment where I decided to dry brush black onto that piece. I kept it looking rustic. I'm not married to the look quite yet so I'm living with it for a bit first. But I do feel like it goes better in the room now since it brings out the dark tones of the other sofa as well as the television.
Am I the only one who starts one project and it spirals into several other projects (not necessarily planned)? Here's one more of the before...
and after...Oh how I could just do project after project... there's just something about making a house into a place where you are comfortable and cozy and happy. What's on your project list these days?
Purchasing Information:
- Lighter Sofa: Ektorp Ikea
- Entry Mirror: Target
- Arrows on Wall above dark sofa: Hobby Lobby and My Home Matters, LLC
- Farmhouse Clock: My Home Matters, LLC
- Pillow covers on bench: Hobby Lobby
- Coffee Table Bench and "Family" Wall Decor: Kirkland's
- TV Unit and Cabinet in Entry: Homegoods
- Wall Tiles: My Home Matters, LLC
1 comment
It looks great Laura! I, accidentally, did something like this technique with my accent tables in my living room. Love your new sofa too. I almost bought the exact same one but went with another slip covered couch at Value City Furniture.