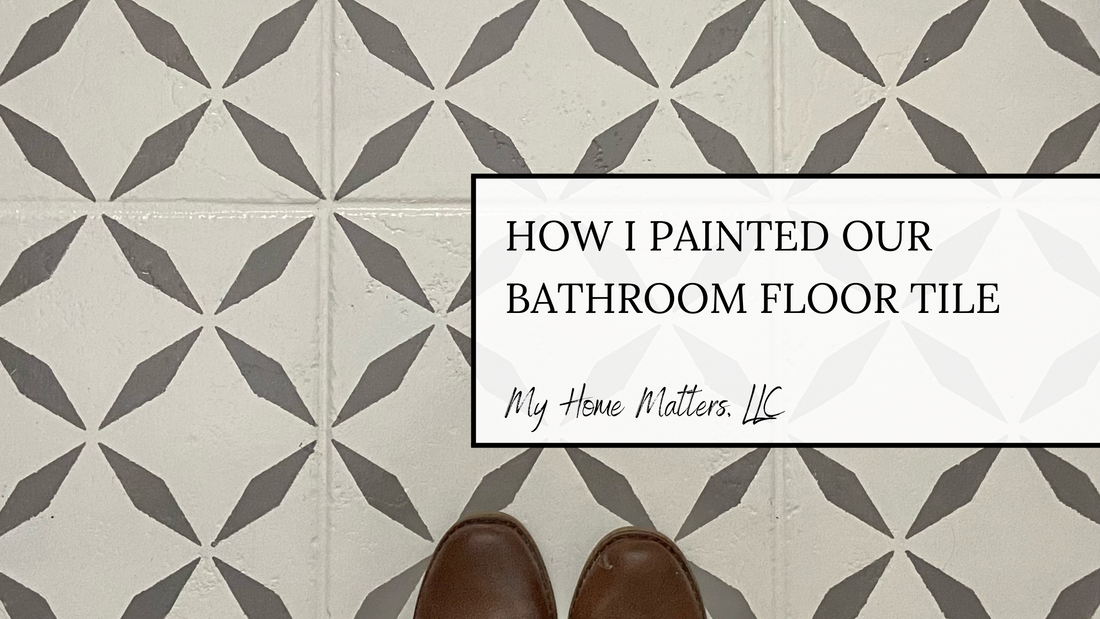
Bathroom Updates - Part I (Painted Tile Floor)
If you've been following on social media, I have been working on the kids' bathroom updates and this past week I painted the tile! I have been wanting to do this for a while now and finally got the nerve to do so since the room is so small. I'll give you the products and the steps to how I did it. (My apologies first of all - I didn't set out to create this blog post when I started. After all, it's been about a year since my last post! Therefore, I didn't get the best pictures along the way as many are screenshots of my Instagram stories. Feel free to head to Instagram to watch my highlighted stories.)
- Rustoleum Floor Coating and Sealer (I used one combo pack which was 1 quart of base white and 1 quart of sealer)
Second Quart of Floor Coating (I had mine tinted in Aged Gray) - Good quality paint brush(es), paint roller and roller covers, paint tray
- Touch up paintbrushes
- Baby wipes
- Stencil (you will need to find a stencil that matches the size of your tiles - mine were 12x12). This is the stencil I used.
- Stencil brush (I like to use a rounded stencil brush. Here is something similar to what I used - the one in the middle, in particular, of the product photo)
- Sand paper (60-grit or 8-grit), sanding block, or orbital sander which is what I used.
- Degreaser (you could use Krud Cutter but the multi pack of floor coating from Home Depot also came with a small bottle of degreaser)
**This post contains affiliate links which means I receive a small commission if you purchase something through my links. However, this comes at no additional cost to you! Feel free to read my full Privacy Notice here. **
Step 1: Clean and degrease.
Use the degreaser of your choice to thoroughly clean your floor to get any grease or residue off. Completely rinse and wipe clean when done. I used the little bottle of degreaser that came in the paint multi pack for two TINY little spots on our bathroom floor. I didn't even think to take a photo. So, if you are doing a larger floor that has lots of grime or build up, please do your research on cleaning it first.
Step 2: Sand for adhesion.
Sand the entire floor with 60-80 grit sandpaper using a sanding block or orbital sander (much easier and quicker). I went over the entire floor. I created stories of the entire process of the floor and uploaded them to my Instagram stories (but the sanding story is out of order in the highlights). You can also watch the video of the entire process if you scroll down to the bottom of this post. Most of it is time-lapsed but it should cover the majority of the process! After sanding the entire floor, wipe an vacuum away all dirt and debris left behind.

Step 3. Time for the base coat.
Apply the base coat (for me this was the standard white that came in the multi pack). I did not know this when I purchased my paint in the store, but I see online that you can also purchase a base coat of black.) I used a good paintbrush to cut in working my way from the window wall and behind the toilet. From there I worked over towards the tub and then towards the door. After painting a section with the paintbrush, I followed immediately by rolling on the same white in that section. Basically, you need to work your way out of the room. Always keep in mind how you will do this. For me, as I worked my way towards the door, I had to close the door and do behind it. Then I had to open it back up and go back to the middle so that I could scoot my way out. The directions on the can said to wait six hours before applying a second coat. Mine definitely needed a second coat!


Step 4: The fun of the stenciling!
Plan your attack with the stencil. Determine where you will start and where you plan to go from there. The paint dries somewhat quickly so this is what I did when I could. I painted a tile, then skipped over a tile while that one dried. That gave just enough time that I could gently lay the stencil back down in between and not cause smudging. I used my rounded stencil brush and dabbed the paint on in an up and down manner rather than brushing it on. Bleeding of the paint under the stencil is much more likely if you brush the paint back and forth. In addition, if you use too much paint at once, it can bleed under. The less bleeding, the less time you will spend with a baby wipe fixing the smudges.


Continue your way just like with the base coat working your way out of the room.

What do you do in the spots where the stencil doesn't fit nicely?
So this is the not so fun part of the project. (Well, on top of the squatting down and bending and twisting. You may as well treat it as a game of Twister.) Then again, my little bathroom was extremely challenging in that regard.. There were so many little nooks and crannies in such a small space. Where the edge is straight and you can bend the stencil, that is what you'll need to do. You could try taping but I preferred not to just so that I didn't mess up other (fresh) paint. I have done a lot of stenciling in my time so I'm fairly experienced in holding the stencil while I paint, even in awkward spots. If it was just impossible to get the stencil to bend in those spots around the toilet, for instance, then I improvised. I traced a couple of the diamond shapes onto cardstock and then traced them onto the floor, filling in by hand. It was important to me to keep the floor looking as realistic as possible.

On top of cutting the little diamonds, I also created a quarter-size stencil out of cardstock. This allowed me a much smaller piece with which to work. (Note: Some stencil companies like Cutting Edge Stencils and Royal Design Studio will send additional pieces that are smaller for just this purpose.)
Step 5: Touch Ups
Once you are happy with all of your stenciling, and it has dried for the recommended six hours, inspect every tile. You are checking to see if you need to do any touching up. If so, now is the time. Take the time to get it right as much as you may want to just be done! Once your touch ups are complete, you can let it dry again for the six hours (or overnight) and then you'll be ready for sealing.
Step 6: Sealer
Follow the instructions on the can but, I found that applying the sealer worked best with a brush rather than a roller. Of course, you will need to start out cutting in with the brush as usual. However, the instructions recommend using a roller to apply the bulk of the sealer. For me, this just caused all the lint in the neighborhood to suddenly appear on the white. It was like a lint magnet. Even with the brush this was an issue but it was ten times as bad with the roller. I have had this issue when sealing custom signs in the past. If the background was white, no matter what brush I used, lint appeared. It was like it was just hanging out in the air waiting to pounce to see how mad it could make me. This photo is super blurry but it's all I had with regards to the sealing process.

Ultimately, in my mind, the sight of brush strokes was easier on the eyes (and my sanity) than the party the lint was having on my nice white background. So I went with it. Still, lint kept literally jumping on the floor out of thin air but I could control it better with the brush. I kept a baby wipe in my hand and tried to get any little hairs or lint pieces lifted with the brush and then quickly and gently wiped onto the baby wipe.
Additional Coverage...
According to the can, one coat of sealer is required. However, with all of the little grooves and crevices in the tumbled tile of mine (not to mention three children who will be using this bathroom), I decided to go with three coats. The good thing about the sealer is that you only have to wait until the first coat is dry to the touch before putting the next coat on. Dry to the touch means 1-2 hours according to the Rustoleum instructions. I waited 2 hours between coats which meant the kids could walk on it enough to brush their teeth before bed that evening and the next morning we could move around freely (but carefully). Overall cure time is 7 days which is not that bad compared to other products with which I have worked. Transforming the floor was an important part of the bathroom updates needed to make it complete.

Other tile painting options:
While this is the only tile painting method I have tried so far, I did use concrete paint to paint my basement concrete workshop floor last spring. (Sorry - no blog posts in 2021 to refer you to.) I also used concrete and exterior paints to transform our front porch floor wo look like brick. It was on these two projects that I used stencils from Cutting Edge Stencils and Royal Design Studio. I have seen folks use outdoor concrete and patio pain on tile inside. I have also seen it done with Chalk Paint by Annie Sloan. Next week I hope to gather all of those product links and show you how it all came together!


If I ever attempt to do our Master Bathroom floor, I may try using another method. But first, I will see how it goes with the Rustoleum Floor Coat. I will update you down the road!
So what do you think? Are you reading because you are trying to decide if you are brave enough to try? Or perhaps you are looking through all of the options looking for the one that seems the most feasible for you? Whatever the case may be, let me know if you try it! But be prepared for patience and follow the steps recommended on the product of your choosing. After all, preparation is key! If you'd like to watch the brief video of how I painted the floor, here you go!
[embed]https://youtu.be/OFRcq7K7t0Q[/embed]
Next week, I hope to have another post for you that details the other bathroom updates. I made a custom sign valance similar to the one I did in our master bedroom. We replaced the storage cabinet above the vanity with a mirror. I painted the vanity the same color as our piano (Athenian Black). You can see that post here! I added peel and stick wallpaper (using the same method as in other areas of our home). And, we swapped out the light fixture. I will gather all product info and come back next week with how it all came together.
