
DIY Stacking Pumpkin Sign Made from Wooden Biscuits
You know those little wooden biscuits typically used for woodworking joints? Well, we’re turning them into adorable stacking pumpkins! This fun fall craft is perfect for your entryway, mantel, or even your floating shelves — and it’s a great way to use up some extra supplies you might already have on hand.
If you were able to snag one of our pre-made Stacked Pumpkin Sign Kits from our DIY Kits & Add Ons Collection — yay! But if they’re sold out, don’t worry. This tutorial will walk you through exactly how to make your own version from scratch.
What You’ll Need:
- Wooden biscuits (sizes 0, 10, and 20 — 6 of each)
→ These are linked in my Amazon storefront
for easy ordering! - Background surface — I used a 10x20" lightweight wooden panel from our Maker’s Market collection
- Hot glue gun & glue sticks
- Acrylic paint (3 coordinating colors that pop against your background)
- Waverly antiquing glaze (optional for distressing)
- Paintbrushes
- Painter’s tape
- Spanish moss
- Small flowers (I used mini sunflowers 🌻)
- Raffia or ribbon for a bow
- Stem — try a small twig, a mini candle cup flipped upside down, or twine-covered wire like I used
- Optional: Scrapbook paper or napkin for decoupage, or a crackle finish for texture (I’ll link my Facebook video tutorial
showing this technique!) - Optional: A small wooden ledge or strip for the bottom edge
- Optional: Stampers for any kind of desired wording OR create your own stencils
Step 1: Prep Your Background
Start by decorating your background panel — you can paint it, decoupage it with scrapbook paper or a pretty napkin, or try a crackle finish for a rustic vibe. I went with a creamy crackle background that really made my pumpkins pop.
(If you’ve never done crackle before, check out my linked Facebook video where I show exactly how to achieve this look!)
Step 2: Paint Your Wooden Biscuits
Lay out your biscuits on the sticky side of painter’s tape — this keeps them from sliding around while you paint. You’ll want to paint:
Six large (size 20) biscuits for the bottom pumpkin
Six medium (size 10) biscuits for the middle pumpkin
Six small (size 0) biscuits for the top pumpkin
Choose three coordinating colors that will look nice against your background. Once dry, apply a thin layer of Waverly antiquing glaze for an aged, distressed finish. Lightly sand the edges for a little extra texture.
Tip: If you’re impatient like me, grab your heat gun to speed up the drying process!


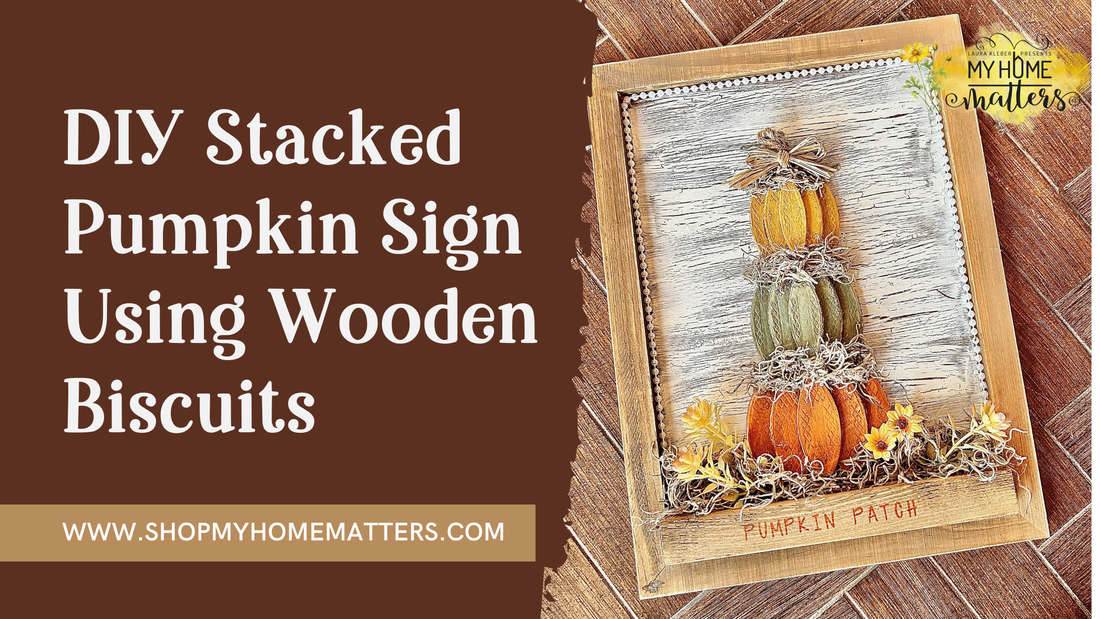
Step 3: Assemble the Pumpkins
Once your biscuits are dry, it’s time to build your pumpkins!
For each pumpkin, use hot glue to attach:
Row 1: 3 biscuits side by side
Row 2: 2 biscuits centered on top of the first row
Row 3: 1 biscuit on top — creating a cute “pyramid” pumpkin shape
Repeat for each pumpkin size, leaving a small space between each pumpkin when you glue them onto your background.
I left a bit of room at the bottom and between pumpkins to tuck in moss and floral accents later.


Step 4: Add Details and Dimension
Glue on your stem of choice to the top pumpkin — a twig, twine-covered wire, or a mini candle cup turned upside down all work great.
Now it’s time to bring your piece to life!
Tuck Spanish moss between and beneath your pumpkins
Add a few mini flowers or fall sprigs from the craft section (Walmart has great options!)
Tie a raffia bow or ribbon at the top at the bottom of the stem.
If you’d like, glue a small wooden ledge at the bottom of your panel to frame your design — it’s optional, but adds a nice finished touch. You could even stencil or stamp on some wording and add a strip of beads around the inner edge (if your background has a frame) for one more finishing touch.


Step 5: Display Your Fall Creation
Once everything is glued in place and cooled, your project is ready to display!
Try setting it:
- On your mantel with other cozy fall accents
- As part of a kitchen or entryway vignette
- On a floating shelf to bring a handmade touch to your fall decor.
Final Thoughts
This project is such a great reminder that creativity can come from the simplest materials — even woodworking biscuits! It’s an easy afternoon DIY that brings warmth, texture, and a whole lot of fall charm to your home.
If you make one, I’d love to see how yours turns out! Tag me on Facebook or Instagram so I can admire your version of this fun fall craft.
CreateInspireBeWell
