DIY Rustic Wooden Headboard
The rustic wooden headboard that lives about the bed in our master bedroom is one of my most asked about projects. When I made it, way back when, I never thought to document my steps for a blog post down the road! But, since our camper renovation is underway, I have the oppportunity to make another one! Granted, this one is on a much smaller scale, but the process is the same and I'm going to show you the steps!
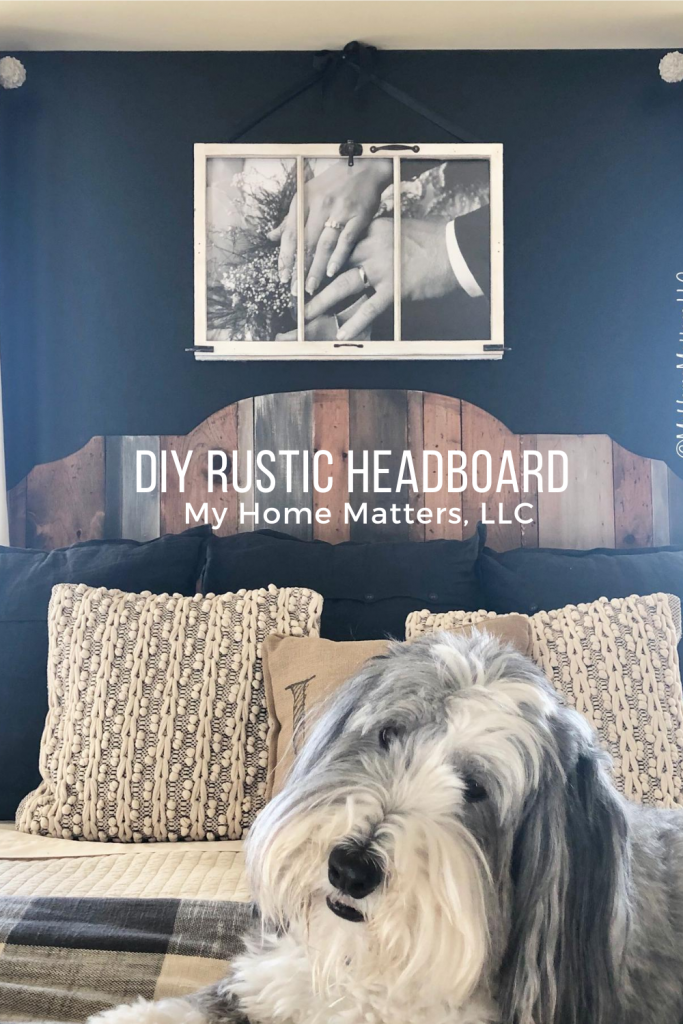
 Once I was happy with the look of the randomness of the sizes, I started cutting. My headboard needed to be 24 inches tall for the camper. The headboard in our bedroom is much larger in terms of height. (We planned for the headboard to come up in front of the window a bit - otherwise you wouldn't even see it.)

 Glue and nail the back pieces across the back of the planks and ta-da! You have a headboard!


 Next, pick a color to start with. (I used black, white, cream, and navy. I never ended up using the bright teal.)
 Use a chip brush to dry brush some paint onto one plank. Randomly choose another plank or two and do the same to those.
 Continue with the other colors. I purposely left a couple of boards free of any paint. And, others I left more unpainted areas than others.
 Once the paints are all dry, apply a coat of Early American stain over the entire piece. It's changes the look completely but in a good way! The more paint you apply to the wood, the less the stain will take. The more raw wood you leave open, the more the stain will "take" in those spots.
 Wipe down the excess stain, let dry and enjoy your masterpiece! If there are spots you aren't happy with, you can add more paint now with the chip brushes and then, even more so, you could go over that again with more stain. Just keep playing until you like it! I used more variations on blue in my headboard for the camper than I did for our bedroom, but that will make sense once you see it all come together soon. Please keep following along with this blog so see how the headboard I made in this post looks once it gets set in it's home inside the camper! Here's a pin for you for future reference if you'd like to try this project!

Supplies Needed:
- Several sizes of 1-inch pine boards (I used 1x2, 1x3, 1x4, 1x6, and 1x8)
- Long pieces of 1-inch pine to attach the planks together on the back
- Paints - I used black, gray, navy, white and cream (latex or acrylic - it really doesn't matter)
- Chip brushes for each color paint
- Minwax Early American stain
- Miscellaneous items to use to "beat up" the wood such as screws, hammer, etc.
- A way to cut the wood to size - I used my miter saw
- A brad nailer and nails
Lay out your boards and cut...
The first step is to arrange the boards in a random fashion alternating different sized boards. I knew I had 60-63 inches to work with so I kept going until I was within that range.Once I was happy with the look of the randomness of the sizes, I started cutting. My headboard needed to be 24 inches tall for the camper. The headboard in our bedroom is much larger in terms of height. (We planned for the headboard to come up in front of the window a bit - otherwise you wouldn't even see it.)
Attach the boards together...
(First, I must mention that the curved cutout look of our master bedroom headboard adds another step. I did not need to make this camper headboard curved. But, in short, what I did for that step was to draw out a sketch of what half of the headboard curve should look like on brown paper. Once I liked that sketch, I used the revers for the other side of the headboard and sketched out that outline on the wood. From there, I proceeded to attach the boards together as follows EXCEPT using backer pieces that fit within the curves. Finally, I used a jigsaw to cut out that tracing of the curves.) That being said, this step is slightly different than what we did for the rustic wooden headboard in our bedroom in one other way as well. Since that one was hung on the wall, we did a French cleat which is a special cut on an angle to the board on the back. In addition, you cut the same angle on a board that goes on the wall only in the opposite direction. For this project, the headboard will be able to sit on top of the bed frame just behind the mattress in front of the window so no French cleat was needed.) Turn the cut boards over in the correct order and attach a long piece across the back. Use a wider board to attach the planks on taller headboards. For mine, since it's not very tall, I used what I had left on my wood shelves. I used a 1x4 at the top and a 1x2 for the bottom. (I wanted to use at least two 1x4's but didn't have enough.)
Glue and nail the back pieces across the back of the planks and ta-da! You have a headboard!
Time for color!
Now, it's time for the fun part. The first thing I did now that the wood was attached was bang the entire thing up with various tools I had close by. I used scissors, a screw driver, a piece of wood and a screw. You could skip this step if you'd like - it just makes the rustic wooden headboard a bit more "rustic."
Next, pick a color to start with. (I used black, white, cream, and navy. I never ended up using the bright teal.)Use a chip brush to dry brush some paint onto one plank. Randomly choose another plank or two and do the same to those.
Continue with the other colors. I purposely left a couple of boards free of any paint. And, others I left more unpainted areas than others.
Once the paints are all dry, apply a coat of Early American stain over the entire piece. It's changes the look completely but in a good way! The more paint you apply to the wood, the less the stain will take. The more raw wood you leave open, the more the stain will "take" in those spots.
Wipe down the excess stain, let dry and enjoy your masterpiece! If there are spots you aren't happy with, you can add more paint now with the chip brushes and then, even more so, you could go over that again with more stain. Just keep playing until you like it! I used more variations on blue in my headboard for the camper than I did for our bedroom, but that will make sense once you see it all come together soon. Please keep following along with this blog so see how the headboard I made in this post looks once it gets set in it's home inside the camper! Here's a pin for you for future reference if you'd like to try this project!